JamieJQuinn Research Software Engineer
Converting C437 to XNA-style Spritesheets
I’ve been struggling to get C437 PNG fonts loaded in Raylib due to its default PNG loader using a slightly different format. Here, I’ll detail a simple way of converting C437 PNGs to the format Raylib expects.
Raylib is a wonderful library for writing quick and simple GUI applications, especially games. I’ve been using it for about a year on various prototypes, most recently a roguelike in Zig. While Raylib’s text rendering is generally good, I wanted to be able to use old-school fonts using the Code page 437 character set. For context, this particular character set is often used for text-based games due to it having useful extra characters like little faces ☺ and walls ╠, but still sticking to a total number of 256 characters. Since font files (like those found at The Oldschool PC Font Resource or Dwarf Fortress’s Tileset Repository) are actually just PNGs, it’s trivial for a user to design a new tileset based on anything they like, not just characters. This is typically how traditional roguelikes like Nethack are tiled.
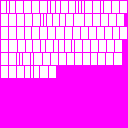
However, Raylib cannot handle these PNGs natively. Its default PNG font loaded expects the characters to be stored in an XNA format, that is every character is represented in a box completely surrounded by a single colour, for example magenta:
In contrast, the C437 PNGs are typically stored as a regular grid of characters, each with the same width:
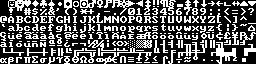
Although this restricts the fonts to a fixed-width size, this is generally what is desired for textual, grid-based games like traditional roguelikes.
To load one of these PNGs as a font, we have to pre-process the image inside Raylib:
const std = @import("std");
const rl = @import("raylib.zig");

pub fn load_c437_font(fname: [:0]const u8, glyph_width: u8, glyph_height: u8) rl.Font {
    // Load original C437 PNG
    const c437_png = rl.LoadImage(fname);
    defer rl.UnloadImage(c437_png);
    std.debug.print("{}\n", .{c437_png});

    // Calculate number of glyphs
    const glyphs_per_row = @divExact(c437_png.width, glyph_width);
    const glyphs_per_col = @divExact(c437_png.height, glyph_height);

    const padding = 1;

    // Create new image to store Raylib-style font
    var font_image = rl.GenImageColor(c437_png.width + glyphs_per_row * padding + padding, c437_png.height + glyphs_per_row * padding + padding, rl.MAGENTA);
    defer rl.UnloadImage(font_image);
    std.debug.print("{}\n", .{font_image});

    for (0..@intCast(glyphs_per_row)) |i| {
        for (0..@intCast(glyphs_per_col)) |j| {
            const src = rl.Rectangle{
                .x = @floatFromInt(i * glyph_width),
                .y = @floatFromInt(j * glyph_height),
                .width = @floatFromInt(glyph_width),
                .height = @floatFromInt(glyph_height),
            };
            const dst = rl.Rectangle{
                .x = @floatFromInt(i * (glyph_width + padding) + padding),
                .y = @floatFromInt(j * (glyph_height + padding) + padding),
                .width = @floatFromInt(glyph_width),
                .height = @floatFromInt(glyph_height),
            };
            // Make sure we alpha-out the space in the new image
            rl.ImageDrawRectangleRec(&font_image, dst, .{ .r = 255, .g = 255, .b = 255, .a = 0 });
            // Actually copy the character
            rl.ImageDraw(&font_image, c437_png, src, dst, .{ .r = 255, .g = 255, .b = 255, .a = 255 });
        }
    }

    return rl.LoadFontFromImage(font_image, rl.MAGENTA, 0);
}
Although the above code is in Zig, it should be relatively straight-forward to read if you’re used to C/C++. Here, I’m using Raylib directly (as opposed to one of the Zig bindings) since it exposes a build.zig file for easy integration with Zig.
Note, for a reason I cannot figure out, Raylib refuses to properly render characters when its numerical value is over 128 so I’ve had to directly call DrawTextCodepoint instead of DrawText, which seems to avoid the issue.